2016年7月28日木曜日

How to use the Slack Channel of "IoT Gateway for BLE" app

Abstract (概要)

このページでは IoT Gateway for BLE アプリの使い方を紹介します
I will introduce how to use of IoT Gateway for BLE app in this page.

Slack チャネルを使ってデバイスから Slack のチャネルに通知する方法を紹介します
I’ll show you how to notification from the device to the channel of the Slack using Slack channel.

アプリ自体のダウンロードは以下の URL からお願いします
App download of thank you from the following URL.
http://apple.co/1Ytn48L

Equipment (環境)

  • IoT Gateway for BLE v1.4
  • Slack ( at 27 July 2016 )
  • BLESerial2

To add an integration of Incomming Webhook (Incomming Webhook URL の作成)

まず、Slack に Incomming Webhooks のインテグレーションを追加します
First, you have to add an integration of webhooks.

https://slack.com/apps にアクセスし「incoming webhook」検索してください
You can search “incoming webhook” in https://slack.com/apps.

そして、Add Configuration からインテグレーションを追加します
Next, tap the “Add Configuration” button.

通知したいチャネルを選択して「Add Incoming Webhooks Integration」を選択したら追加完了です
Input a channel in slack you want notify, and click the “Add Incoming Webhooks Integration”.

アイコンや名前を適当に設定してください
Icon and name is whatever you want.

以下のような Webhook URL が取得できれば Slack 側の準備は OK です
It will be OK. You could get a webhook URL following as:
introduce_gateway_app_ver_slack_add_integration.png

To register the Slack info into the app (アプリに Slack チャネルを登録する)

作成した Slack の Incoming Webhooks の情報をアプリに登録します
Next, you have to regist you created an incoming webhooks URL into the app.

アプリを起動して Channels を選択してください
Launch the “IoT Gateway for BLE” app and tap the “Channels” button.
introduce_gateway_app_ver_mqtt_add_ch1.png

Slack チャネルを選択します
Tap the Slack channel in a list.
introduce_gateway_app_ver_mqtt_add_ch2.png

一番下の New を選択します
And tap a “New” button in the bottom.
introduce_gateway_app_ver_slack_add_ch1.png

すると Slack の Incoming Webhooks の情報を入力する画面になるので先ほど作成した Incoming Webhooks の情報を入力していきます
This will give you the chance to screen for entering the incoming webhooks info. Input the incoming webhooks data that you just created.

以下のように入力できれば OK です
It is OK if you can input your broker data following as:

Incoming Webhook URL のように長い文字列を iPhone で入力するのは大変です
It is hard to enter a long string as Incoming Webhook URL in the iPhone.

メールアプリやメモアプリのような PC とデータを共有できるアプリを使って URL の情報をコピペすると入力が簡単になります
Using an app that can share a data from PC, such as e-mail app and memo app will be information about the URL to easily input and to copy and paste.
introduce_gateway_app_ver_slack_add_ch2.png

接続テストができるので試してみてください
Please try the “Connect Test”.
“Success Connect” になれば問題なく MQTT ブローカーに接続できています
If you can get the message of “Success Connect”, it has been able to connect to the Slack channel without problems.
introduce_gateway_app_ver_slack_add_ch3.png

最後に Add を選択して Slack チャネルの作成を完了してください
Finally you tap the “Add” button, you have completed adding the new Slack channel into the app.

作成が完了すると Slack チャネルの一覧に戻ります
To return to the list of Slack channel then completed adding the new data.
introduce_gateway_app_ver_slack_add_ch4.png

Linking a Bluetooth device (Bluetooth デバイスと紐付ける)

作成したチャネルと Bluetooth デバイスを紐付けます
Your bluetooth device is going to be linked to the Slack channel that you created.

今回 Bluetooth デバイスは自作の BLESerial2 を使用します
In this time, we chose one BLE device of “BLESerial2” made by ourself.

SensorTag など GATT Profile をサポートしている Bluetooth デバイスであれば何でも OK です
Anything is OK if a BLE device that supports the GATT Profile such as SensorTag.

Gateway Home から “New” を選択します
Tap a “New” button in the Home.
introduce_gateway_app_ver_mqtt_add_ch1.png

デバイスモードの選択で “BLE” を選択します
And, tap a “BLE” button in the Device Mode.
またこのときスマートフォンの Bluetooth の機能を ON にしてください
Also, please turn ON the Bluetooth function on your smartphone.
introduce_gateway_app_ver_mqtt_link_ch1.png

BLESerial2 の電源を ON にしてください
To turn on the power of BLESerial2 device.
すると Device List の中に BLESerial2 が見つかるはずです
Then you should find a BLESerial2 in the “Device List”.
introduce_gateway_app_ver_mqtt_link_ch2.png

デバイスを選択したら次に Service を選択します
Next, you should select a Service of you have selected the device.
introduce_gateway_app_ver_mqtt_link_ch3.png

Service を選択したら Characteristic を選択しましょう
And next, you should select a Characteristic of you have selected the service.
今回 “IoT Gateway for BLE” では Notify タイプの Characteristic のみをサポートしています
Only supports “IoT Gateway for BLE” app in Notify type of Characteristic.
これは BLE デバイスからの通知情報をアプリ側で受け取る必要があるためです
Because, it is necessary to receive the notification data from the BLE device in the app side.
Read タイプの Characteristic だとアプリから定期的に値を読み込む必要があり、その場合だとデータが不要なときでも値を取得し続けてしまうため Notify タイプのみをサポートしています
To need to read on a regular basis the value from the application that it is Characteristic of the Read type.
Supports only Notify type for data that it is the case would continue to get the value even when not needed.
introduce_gateway_app_ver_mqtt_link_ch4.png

Notify タイプの Characteristic を選択したら “Notify Test” をタップして本当に問題ないか確認してください
You have selected the Notify type of Characteristic, please make sure not really a problem to tap the “Notify Test” button.
テストが問題なければ “Add” を選択して BLE デバイスを追加してください
Add your BLE device tapping the “Add” button if there is no problem.
introduce_gateway_app_ver_mqtt_link_ch5.png

するとチャネルと紐付ける画面になります
This will give you the chance to screen to link a channel.
今回は先ほど作成した Slack チャネルと紐付けるので “Slack” を選択します
This time select the “Slack” in a list, so you should link a incoming webhook of Slack channel you just created.
introduce_gateway_app_ver_mqtt_link_ch6.png

そして作成した Slack の Incomming Webhooks を選択し OK をタップします
And select the incoming webhooks of Slack that you created and then tap OK.
introduce_gateway_app_ver_slack_link_ch1.png

これで Slack チャネルと BLE デバイスの紐付けが完了しました
To linking the Slack channel and the BLE device is now completed.
この操作が Gateway を作成するという操作になります
This operation will be the operation called as “Creating a Gateway”.
作成が完了すると Gateway の一覧に戻るので作成された Gateway を確認してください
Please check your gateway which has created in the list of Gateways.
introduce_gateway_app_ver_slack_link_ch2.png

Test (動作確認)

それでは最後に動作確認してみます
So the last to try to test your gateway.
作成した Gateway を選択してください
Please select the Gateway you created.

すると Gateway を起動する画面になるので Start をタップしてください
Tap the “Start” button then it will be shown the screen to start the Gateway.
このとき BLE デバイスの電源は ON にしておいてください
Power on your BLE device.
introduce_gateway_app_ver_mqtt_test1.png

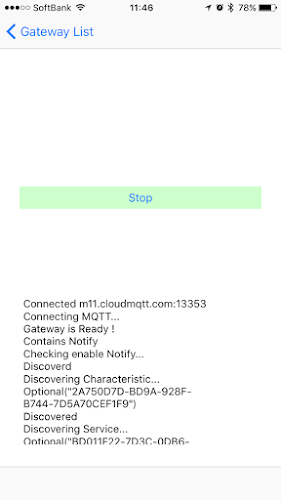
Gateway を起動すると自動的に登録した BLE デバイスを検索し接続してくれます
Search for BLE devices registered to start the Gateway, and has automatically connected to them.
BLE デバイスとの接続が完了すると紐付けした Slack チャネルとの接続が始まります
It will start connection with Slack cahnnel when the connection is completed with the BLE device.
Slack チャネルとの接続も完了すると Gateway の準備が完了しました
And also completed the connection to the Slack channel, the Gateway is ready !
introduce_gateway_app_ver_slack_test1.png

これで BLE デバイスから Notify の情報を送信するとそのデータがそのまま Slack のチャネルにメッセージとして通知されます
When you send the data of Notify from BLE device, it will be notified as messages to the specified Slack channel.
introduce_gateway_app_ver_slack_test2.png

Slack のチャネルを確認すると以下の用に通知されていることを確認できると思います
Finally, you can verify that messages are notified to your channel of Slack following as:
introduce_gateway_app_ver_slack_test3.png

Hot to use the "Non Device" mode in "IoT Gateway for BLE" app

Abstract (概要)

このページでは IoT Gateway for BLE アプリの使い方を紹介します
I will introduce how to use of IoT Gateway for BLE app in this page.

アプリ自体のダウンロードは以下の URL からお願いします
App download of thank you from the following URL.
http://apple.co/1Ytn48L

“Non Device” モードは実際の BLE デバイスを使わないで各チャネルにデータを送信することができるモードです
“Non Device” mode is capable of transmitting data to each channel without the actual BLE devices.

例えるなら IFTTT の “Do” のような機能になります
It likes a function of IFTTT “Do” button.

今回は “Non Device” モードを使って MQTT チャネルに Publish する方法を紹介します
This page shows you how to publish to MQTT channel using the “Non Device” mode.

Equipment (環境)

  • IoT Gateway for BLE v1.4
  • Cloud MQTT (Plan: Cute Cat)

Creating New device with “Non Device” mode (Non Device モードでデバイスの作成)

まず、”Non Device” モードでデバイスを作成します
First, you create a device in the “Non Device” mode

とは言っても、実際のデバイスは無いので名前を設定して終了です
Although , the actual device is nothing, so you’re finished setting the device name.

アプリを起動して “New” を選択してください
Launch the “IoT Gateway for BLE” app and tap the “New” button.
introduce_gateway_app_ver_mqtt_add_ch1.png

“Non Device” モードを選択します
Tap the “Non Device” mode in a list.
introduce_gateway_app_ver_mqtt_link_ch1.png

すると仮想のデバイス名を入力する画面になるので好きな名前を設定します
設定できたら “Add” を選択します
Then you set the virtual device name your like, you will be appeared the screen to enter data.
You tap “Add” button then you have finished setting the name.
introduce_gateway_app_ndm_add_dev1.png

Linking a Channel (チャネルと紐付ける)

作成したデバイスをチャネルと紐付けます
Next, you should link a device to the channel.

“Non Device” モードの編集画面で “Add” ボタンを押した後、既存のチャネルリストを選択する画面になります
After you pressed the “Add” button in the edit screen of “Non Device” mode, It will be on the screen to select an existing channel list.

今回は過去に作成した MQTT チャネルを利用します
In this time, to make use of the MQTT channel that you created in the past.

MQTT チャネルを選択します
Tap the MQTT channel in a list.
introduce_gateway_app_ver_mqtt_add_ch2.png

そして作成した CloudMQTT のブローカーを選択し OK をタップします
And select the CloudMQTT broker that you created and then tap OK.
introduce_gateway_app_ver_mqtt_link_ch7.png

これで MQTT チャネルと “Non Device” デバイスの紐付けが完了しました
To linking the MQTT channel and the “Non Device” device is now completed.
この操作が “Non Device” を使った Gateway を作成するという操作になります
This operation will be the operation called as “Creating a Gateway” using “Non Device” mode.
作成が完了すると Gateway の一覧に戻るので作成された Gateway を確認してください
Please check your gateway which has created in the list of Gateways.
introduce_gateway_app_ndm_link_ch1.png

Test (動作確認)

それでは最後に動作確認してみます
So the last to try to test your gateway.
作成した Gateway を選択してください
Please select the Gateway you created.

すると Gateway を起動する画面になるので Start をタップしてください
Tap the “Start” button then it will be shown the screen to start the Gateway.
introduce_gateway_app_ver_mqtt_test1.png

Gateway を起動すると MQTT チャネルとの接続が始まります
It will start connection with MQTT cahnnel when starting the gateway.
“Non Device” モードではデバイスは存在しないのでデバイスとの接続処理はありません
There is no connection process with some device because the device does not exist in the “Non Device” mode actually.
MQTT チャネルとの接続が完了すると Gateway の準備が完了しました
To complete the connection to the MQTT channel, the Gateway is ready !
Gateway が準備できると上部に “Do” ボタンが表示されます
When the Gateway is ready, the “Do” button will be displayed at the top.
introduce_gateway_app_ndm_test2.png

これで “Non Device” から MQTT チャネルにデータを送信することができます
You can send the data to MQTT channel using the “Do” button of your “Non Device”.
“Do” ボタンを押してみましょう
Let’s press the “Do” button.
introduce_gateway_app_ndm_test3.png

mosquitto_sub コマンドを使った動作確認だと以下のように表示されます
For instance, it is a test that uses a mosquitto_sub command appears as follows:
In the case of “Non Device”, the value ​​that are embedded in the {value} variable will be 0 at a fixed.
introduce_gateway_app_ndm_test1.png

【Getting Started】How to use the MQTT Channel of "IoT Gateway for BLE" app

Abstract (概要)

このページでは IoT Gateway for BLE アプリの使い方を紹介します
I will introduce how to use of IoT Gateway for BLE app in this page.

Getting Started として MQTT チャネルを使ったデータの Publish をする方法を紹介します
This page shows how to publish the data with MQTT channel as Getting Started.

アプリ自体のダウンロードは以下の URL からお願いします
App download of thank you from the following URL.
http://apple.co/1Ytn48L

Equipment (環境)

  • IoT Gateway for BLE v1.4
  • Cloud MQTT (Plan: Cute Cat)
  • BLESerial2

Registration CloudMQTT and making MQTT broker (CloudMQTT の登録とブローカーの作成)

CloudMQTT にアカウントを作成します
Please create an account in CloudMQTT.

アカウント登録にはメールアドレスが必要です
To regist an account is required e-mail address.

アカウントを作成したらブローカーを作成してください
After you created an account, you have to make a broker.

以下のようにブローカーの情報が取得できれば OK です
It is OK if you can get information of the broker in CloudMQTT following as:
introduce_gateway_app_ver_mqtt_broker.png

あとはブローカーにアクセスするユーザと ACL の設定をしてください
You also have to add a user who can access topics of your broker.
introduce_gateway_app_ver_mqtt_user.png

To register a broker info into the app (アプリに MQTT チャネルを登録する)

作成した MQTT の情報をアプリに登録します
Next, you have to regist you created MQTT broker into the app.

アプリを起動して Channels を選択してください
Launch the “IoT Gateway for BLE” app and tap the “Channels” button.
introduce_gateway_app_ver_mqtt_add_ch1.png

MQTT チャネルを選択します
Tap the MQTT channel in a list.
introduce_gateway_app_ver_mqtt_add_ch2.png

一番下の New を選択します
And tap a “New” button in the bottom.
introduce_gateway_app_ver_mqtt_add_ch3.png

すると MQTT のブローカー情報を入力する画面になるので先ほど作成したブローカー情報とユーザ情報を入力していきます
This will give you the chance to screen for entering the MQTT broker info. Input your broker info and the user info that you just created.

以下のように入力できれば OK です
It is OK if you can input your broker data following as:
introduce_gateway_app_ver_mqtt_add_ch4.png

接続テストができるので試してみてください
Please try the “Connect Test”.
“Success Connect” になれば問題なく MQTT ブローカーに接続できています
If you can get the message of “Success Connect”, it has been able to connect to the MQTT broker without problems.
introduce_gateway_app_ver_mqtt_add_ch5.png

最後に Add を選択して MQTT チャネルの作成を完了してください
Finally you tap the “Add” button, you have completed adding the new broker in your MQTT channel.

作成が完了すると MQTT チャネルの一覧に戻ります
To return to the list of MQTT channel then completed adding the new broker.
introduce_gateway_app_ver_mqtt_add_ch6.png

Linking a Bluetooth device (Bluetooth デバイスと紐付ける)

作成したチャネルと Bluetooth デバイスを紐付けます
Your bluetooth device is going to be linked to the MQTT channel that you created.

今回 Bluetooth デバイスは自作の BLESerial2 を使用します
In this time, we chose one BLE device of “BLESerial2” made by ourself.

SensorTag など GATT Profile をサポートしている Bluetooth デバイスであれば何でも OK です
Anything is OK if a BLE device that supports the GATT Profile such as SensorTag.

Gateway Home から “New” を選択します
Tap a “New” button in the Home.
introduce_gateway_app_ver_mqtt_add_ch1.png

デバイスモードの選択で “BLE” を選択します
And, tap a “BLE” button in the Device Mode.
またこのときスマートフォンの Bluetooth の機能を ON にしてください
Also, please turn ON the Bluetooth function on your smartphone.
introduce_gateway_app_ver_mqtt_link_ch1.png

BLESerial2 の電源を ON にしてください
To turn on the power of BLESerial2 device.
すると Device List の中に BLESerial2 が見つかるはずです
Then you should find a BLESerial2 in the “Device List”.
introduce_gateway_app_ver_mqtt_link_ch2.png

デバイスを選択したら次に Service を選択します
Next, you should select a Service of you have selected the device.
introduce_gateway_app_ver_mqtt_link_ch3.png

Service を選択したら Characteristic を選択しましょう
And next, you should select a Characteristic of you have selected the service.
今回 “IoT Gateway for BLE” では Notify タイプの Characteristic のみをサポートしています
Only supports “IoT Gateway for BLE” app in Notify type of Characteristic.
これは BLE デバイスからの通知情報をアプリ側で受け取る必要があるためです
Because, it is necessary to receive the notification data from the BLE device in the app side.
Read タイプの Characteristic だとアプリから定期的に値を読み込む必要があり、その場合だとデータが不要なときでも値を取得し続けてしまうため Notify タイプのみをサポートしています
To need to read on a regular basis the value from the application that it is Characteristic of the Read type.
Supports only Notify type for data that it is the case would continue to get the value even when not needed.
introduce_gateway_app_ver_mqtt_link_ch4.png

Notify タイプの Characteristic を選択したら “Notify Test” をタップして本当に問題ないか確認してください
You have selected the Notify type of Characteristic, please make sure not really a problem to tap the “Notify Test” button.
テストが問題なければ “Add” を選択して BLE デバイスを追加してください
Add your BLE device tapping the “Add” button if there is no problem.
introduce_gateway_app_ver_mqtt_link_ch5.png

するとチャネルと紐付ける画面になります
This will give you the chance to screen to link a channel.
今回は先ほど作成した MQTT チャネルと紐付けるので “MQTT” を選択します
This time select the “MQTT” in a list, so you should link a BLE device to you just created MQTT channel.
introduce_gateway_app_ver_mqtt_link_ch6.png

そして作成した CloudMQTT のブローカーを選択し OK をタップします
And select the CloudMQTT broker that you created and then tap OK.
introduce_gateway_app_ver_mqtt_link_ch7.png

これで MQTT チャネルと BLE デバイスの紐付けが完了しました
To linking the MQTT channel and the BLE device is now completed.
この操作が Gateway を作成するという操作になります
This operation will be the operation called as “Creating a Gateway”.
作成が完了すると Gateway の一覧に戻るので作成された Gateway を確認してください
Please check your gateway which has created in the list of Gateways.
introduce_gateway_app_ver_mqtt_link_ch8.png

Test (動作確認)

それでは最後に動作確認してみます
So the last to try to test your gateway.
作成した Gateway を選択してください
Please select the Gateway you created.

すると Gateway を起動する画面になるので Start をタップしてください
Tap the “Start” button then it will be shown the screen to start the Gateway.
このとき BLE デバイスの電源は ON にしておいてください
Power on your BLE device.
introduce_gateway_app_ver_mqtt_test1.png

Gateway を起動すると自動的に登録した BLE デバイスを検索し接続してくれます
Search for BLE devices registered to start the Gateway, and has automatically connected to them.
BLE デバイスとの接続が完了すると紐付けした MQTT チャネルとの接続が始まります
It will start connection with MQTT cahnnel when the connection is completed with the BLE device.
MQTT チャネルとの接続も完了すると Gateway の準備が完了しました
And also completed the connection to the MQTT channel, the Gateway is ready !
introduce_gateway_app_ver_mqtt_test2.png

これで BLE デバイスから Notify の情報を送信するとそのデータがそのまま MQTT に Publish することができます
When you send the data of Notify from BLE device, it will be published to the MQTT broker.
introduce_gateway_app_ver_mqtt_test3.png

mosquitto_sub コマンドを使った動作確認だと以下のように表示されます
For instance, it is a test that uses a mosquitto_sub command appears as follows:
introduce_gateway_app_ver_mqtt_test4.png