ラベル アプリ の投稿を表示しています。 すべての投稿を表示

2023年5月12日金曜日

LINE-mqttbot を localhost でテストする方法

LINE-mqttbot を localhost でテストする方法

概要

自作の LINE-mqttbot のデバッグ方法をいつも忘れてるのでメモしておきます

ngrok を使います

環境

準備その1: コード取得

準備その2: MQTTブローカーの準備

なんでも OK です
今回は CloudMQTT を使います

準備その3: LINEビジネスアプリの登録

https://developers.line.biz/console/ ここから登録します LINE アカウントがあれば登録できます

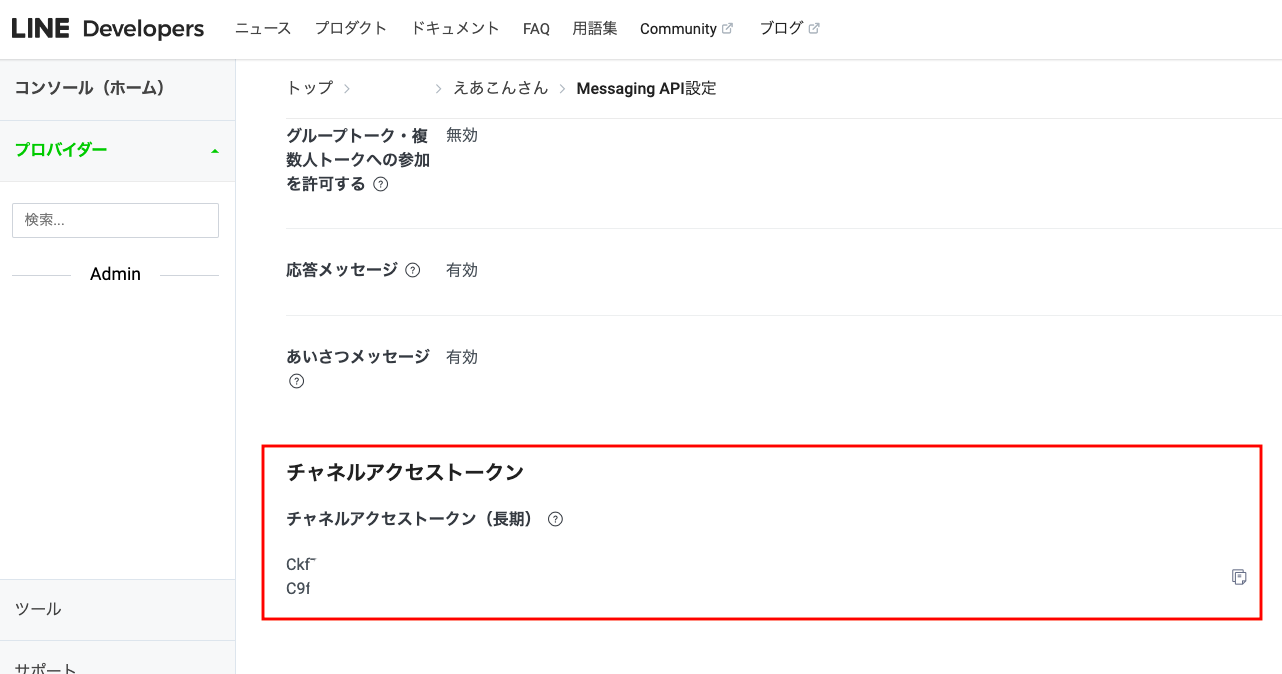
トークンなどの必要な情報をメモしておきましょう

  • チャネルID (LINE_CHANNEL_ID)

  • チャネルシークレット (LINE_CHANNEL_SECRET)

  • チャネルトークン (LINE_CHANNEL_TOKEN)

「セキュリティ設定」の IP アドレス制限は今はないらしいので既存の設定がある場合は削除しておきましょう

起動する

LINE と MQTTブローカの必要な情報を環境変数に設定して起動します

LINE_CHANNEL_SECRET=caxxx \
LINE_CHANNEL_TOKEN=Ckxxx \
MQTT_HOST=m11.cloudmqtt.com \
MQTT_PORT=10707 \
MQTT_TOPIC=topic_name \
MQTT_SUB_TOPIC=topic_name \
MQTT_QOS=0 \
MQTT_USERNAME=username  \
MQTT_PASSWORD=xxxxxxxxxxxx \
bundle exec rackup config.ru

ngrok でグローバルからアクセスできるようにする

9292 ポートで起動するのでそれを ngrok でアクセスできるようにします

  • ngrok http 9292

払い出された URL はメモしておきましょう

ngrok の URL を LINEビジネスアプリのWebhook URL に設定する

  • MessaginAPI 設定 -> Webhook 設定 -> Webhook URL

https://xxx.jp.ngrok.io/callback という感じでちゃんと最後に /callback を設定するのを忘れないようにしましょう

動作確認

  • mosquitto_sub -h m11.cloudmqtt.com -p 10707 -t 'topic_name' -u 'username' -P 'xxxxxxxx'

でメッセージが受け取れるか確認します

あとは携帯やデスクトップ版の LINE アプリから LINE ビジネスアプリと友達になりメッセージを送信して MQTT にまでメッセージが来るか確認すれば OK です

最後に

ngrok の URL は毎回ランダムなものが払い出されるのでそのたびに LINE ビジネスアプリの WebhookURL に設定してあげましょう
ローカルでの動作確認なのでランダムで払い出される URL のほうがセキュアかなと思います (ngrok の場合 URL さえ知っていれば誰でもアクセスできてしまうので)

トラブルシューティング

CloudMQTT は長時間使われていないと停止するので Connection Refuse になる場合は一旦 ResetDB してみてください

2021年12月22日水曜日

memo アプリの紹介

memo アプリの紹介

適当に作ったアプリがいい感じになったので紹介します

URL

現在は Heroku にデプロイしています
個人のサーバやローカルマシンにデプロイして使うこともできます

使い方

好きなテキストや手書きの画像を保存できます
アカウントを作成しなくても利用できます
他の人に見られたくないメモはアカウントを作成しログインしてから保存します

テキストは Home (/) で使えます
チェックボックスをオンにすると複数行のテキストも入力できます

Board (/image) に移動すると手書きのボードが出てきます
マウスでペイントのように使えます
画像も好きなように保存できます
書いた画像を保存しないでダウンロードするだけもできます

機能一覧

  • 好きなテキスト保存/取得
  • 好きな手書き画像の保存/取得
  • アカウント作成/削除
  • アカウントログイン/ログアウト
  • レスポンシブデザイン対応

構成

  • 言語・・・go
  • フレームワーク・・・beego v2
  • データストア・・・Redis

TODO

  • アカウント作成時のセキュリティの考慮
    • パスワードのポリシールールを設ける
    • 2auth など
    • メジャーサービスの OAuth2 対応
  • API 化
    • 現在は WebUI のみ提供
  • 独自ドメインでの運用
    • Heroku or VPS
  • beego v2 の脆弱性対応

2021年10月1日金曜日

IoT Gateway for BLE meets ESP32

IoT Gateway for BLE meets ESP32

Video

Environments

  • ESP32 devkitc v4
  • IoT Gateway for BLE v1.17
  • CloudMQTT
  • Chrome

Sketch

#include <BLEDevice.h>
#include <BLEServer.h>
#include <BLEUtils.h>
#include <BLE2902.h>

BLEServer* pServer = NULL;
BLECharacteristic* pCharacteristic = NULL;
bool deviceConnected = false;
bool oldDeviceConnected = false;
uint32_t value = 255;

#define SERVICE_UUID        "4fafc201-1fb5-459e-8fcc-c5c9c331914b"
#define CHARACTERISTIC_UUID "beb5483e-36e1-4688-b7f5-ea07361b26a8"

class MyServerCallbacks: public BLEServerCallbacks {
    void onConnect(BLEServer* pServer) {
      deviceConnected = true;
    };

    void onDisconnect(BLEServer* pServer) {
      deviceConnected = false;
    }
};

void onButton() {
  // sedning integer 255 via notify
  pCharacteristic->setValue((uint8_t*)&value, 4);
  pCharacteristic->notify();
}

void setup() {
  Serial.begin(115200);
  pinMode(0, INPUT_PULLUP);

  // Create the BLE Device
  BLEDevice::init("ESP32");

  // Create the BLE Server
  pServer = BLEDevice::createServer();
  pServer->setCallbacks(new MyServerCallbacks());

  // Create the BLE Service
  BLEService *pService = pServer->createService(SERVICE_UUID);

  // Create a BLE Characteristic
  pCharacteristic = pService->createCharacteristic(
                      CHARACTERISTIC_UUID,
                      BLECharacteristic::PROPERTY_READ   |
                      BLECharacteristic::PROPERTY_WRITE  |
                      BLECharacteristic::PROPERTY_NOTIFY |
                      BLECharacteristic::PROPERTY_INDICATE
                    );
  pCharacteristic->addDescriptor(new BLE2902());

  // Start the service
  pService->start();

  // Start advertising
  BLEAdvertising *pAdvertising = BLEDevice::getAdvertising();
  pAdvertising->addServiceUUID(SERVICE_UUID);
  pAdvertising->setScanResponse(false);
  pAdvertising->setMinPreferred(0x0);  // set value to 0x00 to not advertise this parameter
  BLEDevice::startAdvertising();
  Serial.println("Waiting a client connection to notify...");
}

void loop() {
  // notify value no button pushed
  if (deviceConnected) {
    static uint8_t lastPinState = 1;
    uint8_t pinState = digitalRead(0);
    if (!pinState && lastPinState) {
      onButton();
    }
    lastPinState = pinState;
  }
  // disconnecting
  if (!deviceConnected && oldDeviceConnected) {
    delay(500); // give the bluetooth stack the chance to get things ready
    pServer->startAdvertising(); // restart advertising
    Serial.println("start advertising");
    oldDeviceConnected = deviceConnected;
  }
  // connecting
  if (deviceConnected && !oldDeviceConnected) {
    // do stuff here on connecting
    oldDeviceConnected = deviceConnected;
  }
}

Websocket

<!DOCTYPE html>
<html>
  <head>
  <meta http-equiv="Content-Type" content="text/html;charset=utf-8"/>
  <script src="https://code.jquery.com/jquery-3.6.0.min.js" integrity="sha256-/xUj+3OJU5yExlq6GSYGSHk7tPXikynS7ogEvDej/m4=" crossorigin="anonymous"></script>
  <script src="https://cdnjs.cloudflare.com/ajax/libs/paho-mqtt/1.0.1/mqttws31.min.js" type="text/javascript"></script>
  <script type="text/javascript">
    var wsbroker = "m11.cloudmqtt.com";
    var wsport = 30707
    var username = "xxxxxxx"
    var password = "xxxxxxx"

    var client = new Paho.MQTT.Client(wsbroker, wsport, "myclientid_" + parseInt(Math.random() * 100, 10));
    client.onConnectionLost = function (responseObject) {
      console.log("connection lost: " + responseObject.errorMessage);
    };
    client.onMessageArrived = function (message) {
      console.log(message.destinationName, ' -- ', message.payloadString);
      var counter = $("#counter");
      var num = parseInt(counter.text());
      num++;
      counter.text(num);
    };
    var options = {
      useSSL: true,
      timeout: 3,
      onSuccess: function () {
        console.log("MQTT connected");
        client.subscribe('#', {qos: 1});
      },
      onFailure: function (message) {
        console.log("MQTT disconnected: " + message.errorMessage);
      }
    };
    options.userName = username;
    options.password = password;
    function init() {
      client.connect(options);
    }
    </script>
    <style type="text/css">
      #counter {
        color: #40e0d0
      }
      .container {
        width: 100%;
        margin: 0 auto;
      }
      h1 {
        text-align: center;
      }
    </style>
  </head>
  <body onload="init();">
    <div class="container">
      <header>
        <h1 id="msg">Pushed button count: <span id="counter">0</span></h1>
      </header>
    </div>
  </body>
  <script src="https://cdnjs.cloudflare.com/ajax/libs/FitText.js/1.2.0/jquery.fittext.min.js" integrity="sha512-e2WVdoOGqKU97DHH6tYamn+eAwLDpyHKqPy4uSv0aGlwDXZKGwyS27sfiIUT8gpZ88/Lr4UZpbRt93QkGRgpug==" crossorigin="anonymous" referrerpolicy="no-referrer"></script>
  <script>
    $("#msg").fitText(1.2);
  </script>
</html>

2019年1月24日木曜日

The support page for "Simple Party Games for DL-200s" App

The support page for "Simple Party Games for DL-200s" App

200s_icon.png

About this page

This page is supporting for “Simple Party Games for DL-200s” game app.
If you have questions or found a bug, please contact me using Twitter or below the comment.

App URL

iOS 版・・・https://apple.co/2RTHZHj

How to play

  1. Connect to 200s with your iPhone or iPad.
  2. Open this app and select a game you like.
  3. Let’s play the party game everyone.

Release Note

v1.2

Added the function to set the position of the darts board.

v1.1

Fix bugs
Apply Dark mode.

v1.0

Released App !

2018年4月4日水曜日

Hulu で配信しているジャイアンツライブを通知してくれるボットを作成しました

hulu_giants_icon.jpg

概要

作りましたというか 1 年前に作っていたのですがググってもボットが検索に引っかからないのでググラビリティを上げるために記事にしておきます
作成したのは Twitter ボットです

ボットの動き

以下の 2 パターンでボットはつぶやきます

  1. 配信がある場合にその日の AM 9:00 につぶやきます
  2. 配信開始の 5 分前くらいに再度つぶやきます

なので 1 日 2 回つぶやいてくれます

使い方

https://twitter.com/hulu_giants

このアカウントをフォローするだけでも自分のタイムラインに出てくるので、それで問題なければフォローだけしてください

メンション等はしていないので基本プッシュ通知などは来ません
なので通知がほしい場合は IFTTT などを使ってください
自分は

これで Slack に通知しています

これを使えば LINE にも通知してくれます
ちなみにこれらの Applet は自分で作成したものではございません
公開されている Applet をありがたく利用させてもらっています

その他

たまーにメンテなどをしているので人間がつぶやくこともあるのでご了承ください
フォロー返しなどは特にしていないので、興味があればフォローして好きに使ってください

Hulu をずっと使っていてライブの通知をしてほしいなーと思っていたのですがなかったので作りました
が、実は自分はもう hulu を解約してしまってボットも使っていないのでよくわからない感じになっています

2018年3月10日土曜日

The support page for _99Taps_ Game App

The support page for _99Taps_ Game App

common_icon.png

About this page

This page is supporting for “99Taps” game app.
If you have questions or found a bug, please contact me using Twitter or below the comment.

App URL

iOS 版・・・https://apple.co/2oXupSN

How to play

  1. Create new a room.
  2. Share room ID to other players.
  3. When you are ready tap the Ready button.
  4. Start the multiplayer’s game.

You try to tap enemies 99 times as quickly as anyone else.
By tapping the player’s number you can bother other player (8 times) !

Privacy Policy

About Advertising ID

IoT Gateway for BLE uses Admob to deliver advertisements. Therefore, identification information called advertising ID is used. In this app, the ad ID is mainly used for delivering ads and collecting information with Analytics using Firebase. It is not used as the main function of this application. Collected data is collected in the cloud and strictly managed. It is not collected by personally managed databases or servers. Please see the following for the privacy policy of each cloud service.

Learn more about Admob’s privacy policy.
Learn more about Firebase Analytics’ privacy policy.

Release Note

v1.11

Updated features and fixed bugs.

v1.10

Disabled the splash screen.

v1.9

Update game user interfaces.

v1.8

Bug fixed.

v1.7

  • Set a giveup button.
  • End the game after 60 seconds.
  • An indicator is displayed when creating a room.

v1.6

Optimized display size for iPhoneX, Xs, XsMax, XR.

v1.5

Bug fixed.

v1.4

I improved UXs in game.

  1. Target color changes when tapping.
  2. I increased the font of score and time.

v1.3

A new feature.

  1. You can join the random room from “Join” button.

v1.2

Three new features.

  1. You can receive push notifications when Random match starts.
  2. You can also toggle ON/OFF whether received push notifications.
  3. Sounds when the player joins the room.

v1.1

Five new features.

  1. Random match now available.
  2. Modified a logic of room creation.
  3. You can’t join a room during playing the game.
  4. During the game, the name label color will be changed according to the score.
  5. You can show the game history in chronological order.

v1.0

Released App !

2018年3月9日金曜日

The support page for "IoT Gateway for BLE" App

The support page for "IoT Gateway for BLE" App

gateway_icon.png

About this page

This page is supporting for “IoT Gateway for BLE” app.
If you have questions or found a bug, please contact me using Twitter or below the comment.

App URL

iOS 版・・・http://apple.co/1Ytn48L
Android 版・・・No support

Getting Started

How to use it (Documents)

Same, but English only ver. (Github)

How to use it (Demo Videos)

  • With SensorTag CC2650 + MQTT Channel
  • With BLESerial2 + MQTT Channel

Privacy Policy

About Advertising ID

IoT Gateway for BLE uses Admob to deliver advertisements. Therefore, identification information called advertising ID is used. In this app, the ad ID is mainly used for delivering ads and collecting information with Analytics using Firebase. It is not used as the main function of this application. Collected data is collected in the cloud and strictly managed. It is not collected by personally managed databases or servers. Please see the following for the privacy policy of each cloud service.

Learn more about Admob’s privacy policy.
Learn more about Firebase Analytics’ privacy policy.

Release Note

v1.18

Update libraries and UI tweaks.

v1.17

Fixed the contents of the debug log when starting the gateway. Don’t show duplicate advertisement uuids.

v1.16

Updated an app privacy policy.

v1.15

Updated dependency packages.

v1.14

I added dark mode feature and fixed bugs and adjusted ui details.

v1.13

Changed app title on your phone.
Convert to swift4.

v1.12

Simple brushed up.

v1.11

Deleted unused library.

v1.10

Could be advertised in a part of pages.

v1.9

Could be shown the password in MQTT channel.
Any features brushed up and bug fixed.

v1.8

Update features for MQTT channel.

  1. Could be send a raw value which is formed hex string value.
  2. Could be send first bytes when connected to the MQTT broker.

v1.7

Added a function of copy mode for existing channels.
Fix bugs.

v1.6

Added a link of Documents.

v1.5

Added a new channel type of MODE and Webhook

v1.4

Added a new device mode “Non Device”

v1.3

Add a channel type of Slack

v1.2

Fix a logic to decide whether notify
Fix bugs

v1.1

Show the type of properties in characteristics list

v1.0

Released App !

2018年1月5日金曜日

「ぶたスラッシュ」アプリサポートページ

「ぶたスラッシュ」アプリサポートページ

butaslash_icon.png

概要

このページは「ぶたスラッシュ」アプリのサポートページです
機能改善、バグ報告、各種問い合わせはこちらのコメントまたは Twitter にてご連絡お願いします

アプリ

iOS 版・・・https://apple.co/2CHhVb4
Android 版・・・提供なし

リリースノート

v1.8

細かい修正を行いました

v1.7

スプラッシュスクリーンの表示を廃止しました

v1.6

インターステイシャル広告を廃止しました
ゲーム終了時にバナー広告を表示します

v1.5

敵と爆弾の当たり判定を修正しました
敵と爆弾が画面外にはみ出すバグを修正しました

v1.4

iPhoneX, Xs, XsMax, XR に最適化しました

v1.3

デフォルトでは音が出ないようにしました

v1.2

スプラッシュ画面がうまく表示されないバグを修正しました

v1.1

効果音を追加しました
ON/OFF できるのでアプリが思い場合は OFF にしてお楽しみください

v1.0

リリースしました

プライバシーポリシー

広告 ID の利用について

ぶたスラッシュ (以下本アプリ) では Admob を使った広告配信をしております。そのため広告 ID と呼ばれる識別情報が使われております。本アプリでは広告 ID は主に広告の配信と Firebase を使った Analytics での情報収集に利用しております。本アプリの主な機能としては使っておりません。収集データはクラウドに収集され厳密に管理されます。個人で管理するデータベースやサーバでは収集しておりません。各クラウドサービスのプライバシーポリシーは以下を御覧ください。

Admob のプライバシーポリシーについてはこちらを御覧ください。
Firebase Analytics のプライバシーポリシーについてはこちらを御覧ください。

2017年11月18日土曜日

「ぶた忍者」アプリサポートページ

「ぶた忍者」アプリサポートページ

butaninja_icon.png

概要

このページは「ぶた忍者」アプリのサポートページです
機能改善、バグ報告、各種問い合わせはこちらのコメントまたは Twitter にてご連絡お願いします

アプリ

iOS 版・・・https://apple.co/2yShowP
Android 版・・・提供なし

プライバシーポリシー

広告 ID の利用について

ぶたスラッシュ (以下本アプリ) では Admob を使った広告配信をしております。そのため広告 ID と呼ばれる識別情報が使われております。本アプリでは広告 ID は主に広告の配信と Firebase を使った Analytics での情報収集に利用しております。本アプリの主な機能としては使っておりません。収集データはクラウドに収集され厳密に管理されます。個人で管理するデータベースやサーバでは収集しておりません。各クラウドサービスのプライバシーポリシーは以下を御覧ください。

Admob のプライバシーポリシーについてはこちらを御覧ください。
Firebase Analytics のプライバシーポリシーについてはこちらを御覧ください。

リリースノート

v1.11

細かい修正を行いました

v1.10

スプラッシュスクリーンの表示を廃止しました

v1.9

インターステイシャル広告を廃止しました
ゲーム終了時にバナー広告を表示します

v1.8

スプラッシュスクリーンを修正しました

v1.7

手裏剣の調整をしました

v1.6

iPhoneX 系のデバイスでのバグを修正しました

v1.5

iPhoneX, Xs, XsMax, XR に最適化しました
iOS10 以上のみサポートするように変更しました

v1.4

レート機能を追加しました
これでだいたい完成です

v1.3

ステージ 5 から 8 まで追加しました
遊び方の説明ページを追加しました
登場する敵、アイテムの一覧を確認できるページを追加しました

v1.2

新ステージを追加しました
ステージ 2, 3, 4 で新たに Level16 まで遊べます
ステージ 5, 6, 7, 8 も今後追加予定です

v1.1

Exp が正常に表示されないバグを修正しました

v1.0

リリースしました

2017年8月24日木曜日

「ぶたもり2D」アプリサポートページ

「ぶたもり2D」アプリサポートページ

butamori_icon.png

ぶたもり2D の LINE スタンプが登場しました!

概要

このページは「ぶたもり2D」アプリのサポートページです
機能改善、バグ報告、各種問い合わせはこちらのコメントまたは Twitter にてご連絡お願いします

アプリ

iOS 版・・・http://apple.co/2wGgBl5
Android 版・・・提供なし

攻略動画

Youtube で攻略動画を公開しました

他のステージの攻略動画もあります
ぶたもり2D 攻略動画

リリースノート

v1.22

細かい修正を行いました

v1.21

スプラッシュスクリーンの表示を廃止しました

v1.20

インターステイシャル広告を廃止しました
ゲーム終了時にバナー広告を表示します

v1.19

土台の当たり判定のバグを修正しました

v1.18

コインボーナスの交換に必要なコインの枚数を大幅に減らしました
黄色のぶたが結合できる条件を修正しました

v1.17

ぶたの当たり判定を修正しました
青ぶたが重なるバグを修正しました

v1.16

お手本の動画を表示する際のバグを修正しました

v.1.15

UI の修正をしました

v1.14

ゴールドの条件の文言追加

v1.13

iPhoneX, Xs, XsMax, XR に最適化しました
iOS10 以上のみサポートするように変更しました

v1.12

スコアの計算方法にバグがあったので修正しました
タイトルロゴに文字枠を付与しました

v1.11

スプラッシュ画面を追加しました

v1.10

タイトルのロゴをポップな感じに変更しました
効果音を追加しました

v1.9

iPhoneX に対応しました

v1.8

すべてのログインボーナスを実装しました
すべてのコインボーナスを実装しました
次のバージョンで iPhoneX 対応します、すいません

v1.7

初級、中級、上級ステージを 9 つまで増やしました
コイン制度を導入しました
コインで交換できるアイテムを 3 つ (タイトルレインボー、ログイン、称号) を解放しました
またリファクタリングしました

v1.6

超上級を解放しました
初級、中級のステージを追加しました
コイン制度を導入しました
リファクタリングしました (xcode9 対応)

v1.5

iOS8 以上の端末で動作するように対応しました
タップ時のぶたを落下させる挙動を調整しました

v1.4

ボーナス一覧画面で回数が正しく表示されないバグを修正しました
遊び方からプライのお手本動画を表示できるようにしました
インタースティシャル広告をぶっこみました

v1.3

上級ステージを追加しました
ログインボーナスの要素を追加しました (ストック機能)
※ボーナス一覧で「ストック機能」の達成回数が 7 日になっていますが正しくは「14」の間違いです
実際は 14 回ログイン後に解放されます
次バージョンにて修正予定です

v1.2

データの保存方法を UserDefaults から Realm を使うように変更しました
これでアプリをバージョンアップした際にデータがクリアされないようになりました
タイトルにログインボーナス一覧へのツールチップを配置しました

v1.1

ログインボーナス機能を追加しました
物理エンジンのチューニングを行いました
App プレビューを更新しました
Firebase/Analytics を導入させていただきました

がこのバージョンにアップデートするとスコアが 0 にクリアされてしまうバグが確認されています
現在修正中で次のバージョンからデータがクリアされなくなるため、現在のバージョンでプレイしたデータも次のバージョンにアップデートしたときにクリアされてしまいます
申し訳ございません

v1.0

リリースしました
ステージは中級まで遊べます

プライバシーポリシー

広告 ID の利用について

ぶたスラッシュ (以下本アプリ) では Admob を使った広告配信をしております。そのため広告 ID と呼ばれる識別情報が使われております。本アプリでは広告 ID は主に広告の配信と Firebase を使った Analytics での情報収集に利用しております。本アプリの主な機能としては使っておりません。収集データはクラウドに収集され厳密に管理されます。個人で管理するデータベースやサーバでは収集しておりません。各クラウドサービスのプライバシーポリシーは以下を御覧ください。

Admob のプライバシーポリシーについてはこちらを御覧ください。
Firebase Analytics のプライバシーポリシーについてはこちらを御覧ください。

2016年7月28日木曜日

How to use the Slack Channel of "IoT Gateway for BLE" app

Abstract (概要)

このページでは IoT Gateway for BLE アプリの使い方を紹介します
I will introduce how to use of IoT Gateway for BLE app in this page.

Slack チャネルを使ってデバイスから Slack のチャネルに通知する方法を紹介します
I’ll show you how to notification from the device to the channel of the Slack using Slack channel.

アプリ自体のダウンロードは以下の URL からお願いします
App download of thank you from the following URL.
http://apple.co/1Ytn48L

Equipment (環境)

  • IoT Gateway for BLE v1.4
  • Slack ( at 27 July 2016 )
  • BLESerial2

To add an integration of Incomming Webhook (Incomming Webhook URL の作成)

まず、Slack に Incomming Webhooks のインテグレーションを追加します
First, you have to add an integration of webhooks.

https://slack.com/apps にアクセスし「incoming webhook」検索してください
You can search “incoming webhook” in https://slack.com/apps.

そして、Add Configuration からインテグレーションを追加します
Next, tap the “Add Configuration” button.

通知したいチャネルを選択して「Add Incoming Webhooks Integration」を選択したら追加完了です
Input a channel in slack you want notify, and click the “Add Incoming Webhooks Integration”.

アイコンや名前を適当に設定してください
Icon and name is whatever you want.

以下のような Webhook URL が取得できれば Slack 側の準備は OK です
It will be OK. You could get a webhook URL following as:
introduce_gateway_app_ver_slack_add_integration.png

To register the Slack info into the app (アプリに Slack チャネルを登録する)

作成した Slack の Incoming Webhooks の情報をアプリに登録します
Next, you have to regist you created an incoming webhooks URL into the app.

アプリを起動して Channels を選択してください
Launch the “IoT Gateway for BLE” app and tap the “Channels” button.
introduce_gateway_app_ver_mqtt_add_ch1.png

Slack チャネルを選択します
Tap the Slack channel in a list.
introduce_gateway_app_ver_mqtt_add_ch2.png

一番下の New を選択します
And tap a “New” button in the bottom.
introduce_gateway_app_ver_slack_add_ch1.png

すると Slack の Incoming Webhooks の情報を入力する画面になるので先ほど作成した Incoming Webhooks の情報を入力していきます
This will give you the chance to screen for entering the incoming webhooks info. Input the incoming webhooks data that you just created.

以下のように入力できれば OK です
It is OK if you can input your broker data following as:

Incoming Webhook URL のように長い文字列を iPhone で入力するのは大変です
It is hard to enter a long string as Incoming Webhook URL in the iPhone.

メールアプリやメモアプリのような PC とデータを共有できるアプリを使って URL の情報をコピペすると入力が簡単になります
Using an app that can share a data from PC, such as e-mail app and memo app will be information about the URL to easily input and to copy and paste.
introduce_gateway_app_ver_slack_add_ch2.png

接続テストができるので試してみてください
Please try the “Connect Test”.
“Success Connect” になれば問題なく MQTT ブローカーに接続できています
If you can get the message of “Success Connect”, it has been able to connect to the Slack channel without problems.
introduce_gateway_app_ver_slack_add_ch3.png

最後に Add を選択して Slack チャネルの作成を完了してください
Finally you tap the “Add” button, you have completed adding the new Slack channel into the app.

作成が完了すると Slack チャネルの一覧に戻ります
To return to the list of Slack channel then completed adding the new data.
introduce_gateway_app_ver_slack_add_ch4.png

Linking a Bluetooth device (Bluetooth デバイスと紐付ける)

作成したチャネルと Bluetooth デバイスを紐付けます
Your bluetooth device is going to be linked to the Slack channel that you created.

今回 Bluetooth デバイスは自作の BLESerial2 を使用します
In this time, we chose one BLE device of “BLESerial2” made by ourself.

SensorTag など GATT Profile をサポートしている Bluetooth デバイスであれば何でも OK です
Anything is OK if a BLE device that supports the GATT Profile such as SensorTag.

Gateway Home から “New” を選択します
Tap a “New” button in the Home.
introduce_gateway_app_ver_mqtt_add_ch1.png

デバイスモードの選択で “BLE” を選択します
And, tap a “BLE” button in the Device Mode.
またこのときスマートフォンの Bluetooth の機能を ON にしてください
Also, please turn ON the Bluetooth function on your smartphone.
introduce_gateway_app_ver_mqtt_link_ch1.png

BLESerial2 の電源を ON にしてください
To turn on the power of BLESerial2 device.
すると Device List の中に BLESerial2 が見つかるはずです
Then you should find a BLESerial2 in the “Device List”.
introduce_gateway_app_ver_mqtt_link_ch2.png

デバイスを選択したら次に Service を選択します
Next, you should select a Service of you have selected the device.
introduce_gateway_app_ver_mqtt_link_ch3.png

Service を選択したら Characteristic を選択しましょう
And next, you should select a Characteristic of you have selected the service.
今回 “IoT Gateway for BLE” では Notify タイプの Characteristic のみをサポートしています
Only supports “IoT Gateway for BLE” app in Notify type of Characteristic.
これは BLE デバイスからの通知情報をアプリ側で受け取る必要があるためです
Because, it is necessary to receive the notification data from the BLE device in the app side.
Read タイプの Characteristic だとアプリから定期的に値を読み込む必要があり、その場合だとデータが不要なときでも値を取得し続けてしまうため Notify タイプのみをサポートしています
To need to read on a regular basis the value from the application that it is Characteristic of the Read type.
Supports only Notify type for data that it is the case would continue to get the value even when not needed.
introduce_gateway_app_ver_mqtt_link_ch4.png

Notify タイプの Characteristic を選択したら “Notify Test” をタップして本当に問題ないか確認してください
You have selected the Notify type of Characteristic, please make sure not really a problem to tap the “Notify Test” button.
テストが問題なければ “Add” を選択して BLE デバイスを追加してください
Add your BLE device tapping the “Add” button if there is no problem.
introduce_gateway_app_ver_mqtt_link_ch5.png

するとチャネルと紐付ける画面になります
This will give you the chance to screen to link a channel.
今回は先ほど作成した Slack チャネルと紐付けるので “Slack” を選択します
This time select the “Slack” in a list, so you should link a incoming webhook of Slack channel you just created.
introduce_gateway_app_ver_mqtt_link_ch6.png

そして作成した Slack の Incomming Webhooks を選択し OK をタップします
And select the incoming webhooks of Slack that you created and then tap OK.
introduce_gateway_app_ver_slack_link_ch1.png

これで Slack チャネルと BLE デバイスの紐付けが完了しました
To linking the Slack channel and the BLE device is now completed.
この操作が Gateway を作成するという操作になります
This operation will be the operation called as “Creating a Gateway”.
作成が完了すると Gateway の一覧に戻るので作成された Gateway を確認してください
Please check your gateway which has created in the list of Gateways.
introduce_gateway_app_ver_slack_link_ch2.png

Test (動作確認)

それでは最後に動作確認してみます
So the last to try to test your gateway.
作成した Gateway を選択してください
Please select the Gateway you created.

すると Gateway を起動する画面になるので Start をタップしてください
Tap the “Start” button then it will be shown the screen to start the Gateway.
このとき BLE デバイスの電源は ON にしておいてください
Power on your BLE device.
introduce_gateway_app_ver_mqtt_test1.png

Gateway を起動すると自動的に登録した BLE デバイスを検索し接続してくれます
Search for BLE devices registered to start the Gateway, and has automatically connected to them.
BLE デバイスとの接続が完了すると紐付けした Slack チャネルとの接続が始まります
It will start connection with Slack cahnnel when the connection is completed with the BLE device.
Slack チャネルとの接続も完了すると Gateway の準備が完了しました
And also completed the connection to the Slack channel, the Gateway is ready !
introduce_gateway_app_ver_slack_test1.png

これで BLE デバイスから Notify の情報を送信するとそのデータがそのまま Slack のチャネルにメッセージとして通知されます
When you send the data of Notify from BLE device, it will be notified as messages to the specified Slack channel.
introduce_gateway_app_ver_slack_test2.png

Slack のチャネルを確認すると以下の用に通知されていることを確認できると思います
Finally, you can verify that messages are notified to your channel of Slack following as:
introduce_gateway_app_ver_slack_test3.png

Hot to use the "Non Device" mode in "IoT Gateway for BLE" app

Abstract (概要)

このページでは IoT Gateway for BLE アプリの使い方を紹介します
I will introduce how to use of IoT Gateway for BLE app in this page.

アプリ自体のダウンロードは以下の URL からお願いします
App download of thank you from the following URL.
http://apple.co/1Ytn48L

“Non Device” モードは実際の BLE デバイスを使わないで各チャネルにデータを送信することができるモードです
“Non Device” mode is capable of transmitting data to each channel without the actual BLE devices.

例えるなら IFTTT の “Do” のような機能になります
It likes a function of IFTTT “Do” button.

今回は “Non Device” モードを使って MQTT チャネルに Publish する方法を紹介します
This page shows you how to publish to MQTT channel using the “Non Device” mode.

Equipment (環境)

  • IoT Gateway for BLE v1.4
  • Cloud MQTT (Plan: Cute Cat)

Creating New device with “Non Device” mode (Non Device モードでデバイスの作成)

まず、”Non Device” モードでデバイスを作成します
First, you create a device in the “Non Device” mode

とは言っても、実際のデバイスは無いので名前を設定して終了です
Although , the actual device is nothing, so you’re finished setting the device name.

アプリを起動して “New” を選択してください
Launch the “IoT Gateway for BLE” app and tap the “New” button.
introduce_gateway_app_ver_mqtt_add_ch1.png

“Non Device” モードを選択します
Tap the “Non Device” mode in a list.
introduce_gateway_app_ver_mqtt_link_ch1.png

すると仮想のデバイス名を入力する画面になるので好きな名前を設定します
設定できたら “Add” を選択します
Then you set the virtual device name your like, you will be appeared the screen to enter data.
You tap “Add” button then you have finished setting the name.
introduce_gateway_app_ndm_add_dev1.png

Linking a Channel (チャネルと紐付ける)

作成したデバイスをチャネルと紐付けます
Next, you should link a device to the channel.

“Non Device” モードの編集画面で “Add” ボタンを押した後、既存のチャネルリストを選択する画面になります
After you pressed the “Add” button in the edit screen of “Non Device” mode, It will be on the screen to select an existing channel list.

今回は過去に作成した MQTT チャネルを利用します
In this time, to make use of the MQTT channel that you created in the past.

MQTT チャネルを選択します
Tap the MQTT channel in a list.
introduce_gateway_app_ver_mqtt_add_ch2.png

そして作成した CloudMQTT のブローカーを選択し OK をタップします
And select the CloudMQTT broker that you created and then tap OK.
introduce_gateway_app_ver_mqtt_link_ch7.png

これで MQTT チャネルと “Non Device” デバイスの紐付けが完了しました
To linking the MQTT channel and the “Non Device” device is now completed.
この操作が “Non Device” を使った Gateway を作成するという操作になります
This operation will be the operation called as “Creating a Gateway” using “Non Device” mode.
作成が完了すると Gateway の一覧に戻るので作成された Gateway を確認してください
Please check your gateway which has created in the list of Gateways.
introduce_gateway_app_ndm_link_ch1.png

Test (動作確認)

それでは最後に動作確認してみます
So the last to try to test your gateway.
作成した Gateway を選択してください
Please select the Gateway you created.

すると Gateway を起動する画面になるので Start をタップしてください
Tap the “Start” button then it will be shown the screen to start the Gateway.
introduce_gateway_app_ver_mqtt_test1.png

Gateway を起動すると MQTT チャネルとの接続が始まります
It will start connection with MQTT cahnnel when starting the gateway.
“Non Device” モードではデバイスは存在しないのでデバイスとの接続処理はありません
There is no connection process with some device because the device does not exist in the “Non Device” mode actually.
MQTT チャネルとの接続が完了すると Gateway の準備が完了しました
To complete the connection to the MQTT channel, the Gateway is ready !
Gateway が準備できると上部に “Do” ボタンが表示されます
When the Gateway is ready, the “Do” button will be displayed at the top.
introduce_gateway_app_ndm_test2.png

これで “Non Device” から MQTT チャネルにデータを送信することができます
You can send the data to MQTT channel using the “Do” button of your “Non Device”.
“Do” ボタンを押してみましょう
Let’s press the “Do” button.
introduce_gateway_app_ndm_test3.png

mosquitto_sub コマンドを使った動作確認だと以下のように表示されます
For instance, it is a test that uses a mosquitto_sub command appears as follows:
In the case of “Non Device”, the value ​​that are embedded in the {value} variable will be 0 at a fixed.
introduce_gateway_app_ndm_test1.png

【Getting Started】How to use the MQTT Channel of "IoT Gateway for BLE" app

Abstract (概要)

このページでは IoT Gateway for BLE アプリの使い方を紹介します
I will introduce how to use of IoT Gateway for BLE app in this page.

Getting Started として MQTT チャネルを使ったデータの Publish をする方法を紹介します
This page shows how to publish the data with MQTT channel as Getting Started.

アプリ自体のダウンロードは以下の URL からお願いします
App download of thank you from the following URL.
http://apple.co/1Ytn48L

Equipment (環境)

  • IoT Gateway for BLE v1.4
  • Cloud MQTT (Plan: Cute Cat)
  • BLESerial2

Registration CloudMQTT and making MQTT broker (CloudMQTT の登録とブローカーの作成)

CloudMQTT にアカウントを作成します
Please create an account in CloudMQTT.

アカウント登録にはメールアドレスが必要です
To regist an account is required e-mail address.

アカウントを作成したらブローカーを作成してください
After you created an account, you have to make a broker.

以下のようにブローカーの情報が取得できれば OK です
It is OK if you can get information of the broker in CloudMQTT following as:
introduce_gateway_app_ver_mqtt_broker.png

あとはブローカーにアクセスするユーザと ACL の設定をしてください
You also have to add a user who can access topics of your broker.
introduce_gateway_app_ver_mqtt_user.png

To register a broker info into the app (アプリに MQTT チャネルを登録する)

作成した MQTT の情報をアプリに登録します
Next, you have to regist you created MQTT broker into the app.

アプリを起動して Channels を選択してください
Launch the “IoT Gateway for BLE” app and tap the “Channels” button.
introduce_gateway_app_ver_mqtt_add_ch1.png

MQTT チャネルを選択します
Tap the MQTT channel in a list.
introduce_gateway_app_ver_mqtt_add_ch2.png

一番下の New を選択します
And tap a “New” button in the bottom.
introduce_gateway_app_ver_mqtt_add_ch3.png

すると MQTT のブローカー情報を入力する画面になるので先ほど作成したブローカー情報とユーザ情報を入力していきます
This will give you the chance to screen for entering the MQTT broker info. Input your broker info and the user info that you just created.

以下のように入力できれば OK です
It is OK if you can input your broker data following as:
introduce_gateway_app_ver_mqtt_add_ch4.png

接続テストができるので試してみてください
Please try the “Connect Test”.
“Success Connect” になれば問題なく MQTT ブローカーに接続できています
If you can get the message of “Success Connect”, it has been able to connect to the MQTT broker without problems.
introduce_gateway_app_ver_mqtt_add_ch5.png

最後に Add を選択して MQTT チャネルの作成を完了してください
Finally you tap the “Add” button, you have completed adding the new broker in your MQTT channel.

作成が完了すると MQTT チャネルの一覧に戻ります
To return to the list of MQTT channel then completed adding the new broker.
introduce_gateway_app_ver_mqtt_add_ch6.png

Linking a Bluetooth device (Bluetooth デバイスと紐付ける)

作成したチャネルと Bluetooth デバイスを紐付けます
Your bluetooth device is going to be linked to the MQTT channel that you created.

今回 Bluetooth デバイスは自作の BLESerial2 を使用します
In this time, we chose one BLE device of “BLESerial2” made by ourself.

SensorTag など GATT Profile をサポートしている Bluetooth デバイスであれば何でも OK です
Anything is OK if a BLE device that supports the GATT Profile such as SensorTag.

Gateway Home から “New” を選択します
Tap a “New” button in the Home.
introduce_gateway_app_ver_mqtt_add_ch1.png

デバイスモードの選択で “BLE” を選択します
And, tap a “BLE” button in the Device Mode.
またこのときスマートフォンの Bluetooth の機能を ON にしてください
Also, please turn ON the Bluetooth function on your smartphone.
introduce_gateway_app_ver_mqtt_link_ch1.png

BLESerial2 の電源を ON にしてください
To turn on the power of BLESerial2 device.
すると Device List の中に BLESerial2 が見つかるはずです
Then you should find a BLESerial2 in the “Device List”.
introduce_gateway_app_ver_mqtt_link_ch2.png

デバイスを選択したら次に Service を選択します
Next, you should select a Service of you have selected the device.
introduce_gateway_app_ver_mqtt_link_ch3.png

Service を選択したら Characteristic を選択しましょう
And next, you should select a Characteristic of you have selected the service.
今回 “IoT Gateway for BLE” では Notify タイプの Characteristic のみをサポートしています
Only supports “IoT Gateway for BLE” app in Notify type of Characteristic.
これは BLE デバイスからの通知情報をアプリ側で受け取る必要があるためです
Because, it is necessary to receive the notification data from the BLE device in the app side.
Read タイプの Characteristic だとアプリから定期的に値を読み込む必要があり、その場合だとデータが不要なときでも値を取得し続けてしまうため Notify タイプのみをサポートしています
To need to read on a regular basis the value from the application that it is Characteristic of the Read type.
Supports only Notify type for data that it is the case would continue to get the value even when not needed.
introduce_gateway_app_ver_mqtt_link_ch4.png

Notify タイプの Characteristic を選択したら “Notify Test” をタップして本当に問題ないか確認してください
You have selected the Notify type of Characteristic, please make sure not really a problem to tap the “Notify Test” button.
テストが問題なければ “Add” を選択して BLE デバイスを追加してください
Add your BLE device tapping the “Add” button if there is no problem.
introduce_gateway_app_ver_mqtt_link_ch5.png

するとチャネルと紐付ける画面になります
This will give you the chance to screen to link a channel.
今回は先ほど作成した MQTT チャネルと紐付けるので “MQTT” を選択します
This time select the “MQTT” in a list, so you should link a BLE device to you just created MQTT channel.
introduce_gateway_app_ver_mqtt_link_ch6.png

そして作成した CloudMQTT のブローカーを選択し OK をタップします
And select the CloudMQTT broker that you created and then tap OK.
introduce_gateway_app_ver_mqtt_link_ch7.png

これで MQTT チャネルと BLE デバイスの紐付けが完了しました
To linking the MQTT channel and the BLE device is now completed.
この操作が Gateway を作成するという操作になります
This operation will be the operation called as “Creating a Gateway”.
作成が完了すると Gateway の一覧に戻るので作成された Gateway を確認してください
Please check your gateway which has created in the list of Gateways.
introduce_gateway_app_ver_mqtt_link_ch8.png

Test (動作確認)

それでは最後に動作確認してみます
So the last to try to test your gateway.
作成した Gateway を選択してください
Please select the Gateway you created.

すると Gateway を起動する画面になるので Start をタップしてください
Tap the “Start” button then it will be shown the screen to start the Gateway.
このとき BLE デバイスの電源は ON にしておいてください
Power on your BLE device.
introduce_gateway_app_ver_mqtt_test1.png

Gateway を起動すると自動的に登録した BLE デバイスを検索し接続してくれます
Search for BLE devices registered to start the Gateway, and has automatically connected to them.
BLE デバイスとの接続が完了すると紐付けした MQTT チャネルとの接続が始まります
It will start connection with MQTT cahnnel when the connection is completed with the BLE device.
MQTT チャネルとの接続も完了すると Gateway の準備が完了しました
And also completed the connection to the MQTT channel, the Gateway is ready !
introduce_gateway_app_ver_mqtt_test2.png

これで BLE デバイスから Notify の情報を送信するとそのデータがそのまま MQTT に Publish することができます
When you send the data of Notify from BLE device, it will be published to the MQTT broker.
introduce_gateway_app_ver_mqtt_test3.png

mosquitto_sub コマンドを使った動作確認だと以下のように表示されます
For instance, it is a test that uses a mosquitto_sub command appears as follows:
introduce_gateway_app_ver_mqtt_test4.png