JUnitを使ってみた【サンプル】
をantからキックできるようにするためにbuild.xmlを作成してみました。
eclipseのAll in oneを使用しているとantのDTKがデフォルトでインストールされているので簡単にbuild.xmlが作成できるので、今回はその方法をご紹介いたします
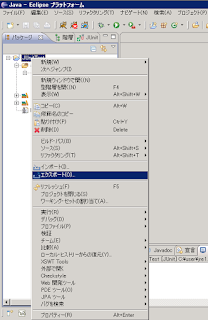
①プロジェクトを右クリックしてエクスポートをクリック

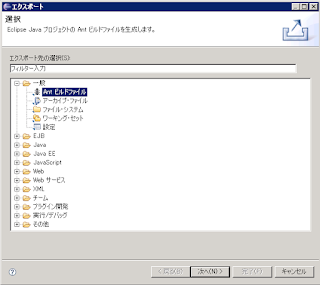
②エクスポートのウィザードが表示されるので、「一般」→「Antビルドファイル」を選択し、次へを押下する

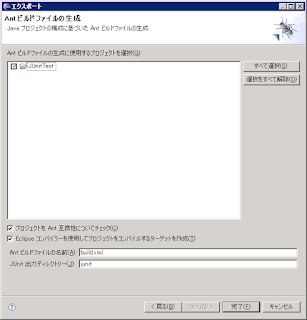
③Antビルドファイルの生成ウィザードでプロジェクトが選択されていることを確認したら完了を押下する

作成されたXMLファイルも記載しておきます。
<?xml version="1.0" encoding="UTF-8" standalone="no"?>
<!-- WARNING: Eclipse auto-generated file.
              Any modifications will be overwritten.
              To include a user specific buildfile here, simply create one in the same
              directory with the processing instruction <?eclipse.ant.import?>
              as the first entry and export the buildfile again. -->
<project basedir="." default="build" name="JUnitTest">
    <property environment="env"/>
    <property name="ECLIPSE_HOME" value="../../../eclipse"/>
    <property name="junit.output.dir" value="junit"/>
    <property name="debuglevel" value="source,lines,vars"/>
    <property name="target" value="1.5"/>
    <property name="source" value="1.5"/>
    <path id="JUnit 3.libraryclasspath">
        <pathelement location="${ECLIPSE_HOME}/plugins/org.junit_3.8.2.v20080602-1318/junit.jar"/>
    </path>
    <path id="JUnitTest.classpath">
        <pathelement location="bin"/>
        <path refid="JUnit 3.libraryclasspath"/>
    </path>
    <target name="init">
        <mkdir dir="bin"/>
        <copy includeemptydirs="false" todir="bin">
            <fileset dir="src" excludes="**/*.launch, **/*.java"/>
        </copy>
    </target>
    <target name="clean">
        <delete dir="bin"/>
    </target>
    <target depends="clean" name="cleanall"/>
    <target depends="build-subprojects,build-project" name="build"/>
    <target name="build-subprojects"/>
    <target depends="init" name="build-project">
        <echo message="${ant.project.name}: ${ant.file}"/>
        <javac debug="true" debuglevel="${debuglevel}" destdir="bin" source="${source}" target="${target}">
            <src path="src"/>
            <classpath refid="JUnitTest.classpath"/>
        </javac>
    </target>
    <target description="Build all projects which reference this project. Useful to propagate changes." name="build-refprojects"/>
    <target description="copy Eclipse compiler jars to ant lib directory" name="init-eclipse-compiler">
        <copy todir="${ant.library.dir}">
            <fileset dir="${ECLIPSE_HOME}/plugins" includes="org.eclipse.jdt.core_*.jar"/>
        </copy>
        <unzip dest="${ant.library.dir}">
            <patternset includes="jdtCompilerAdapter.jar"/>
            <fileset dir="${ECLIPSE_HOME}/plugins" includes="org.eclipse.jdt.core_*.jar"/>
        </unzip>
    </target>
    <target description="compile project with Eclipse compiler" name="build-eclipse-compiler">
        <property name="build.compiler" value="org.eclipse.jdt.core.JDTCompilerAdapter"/>
        <antcall target="build"/>
    </target>
    <target name="Test">
        <mkdir dir="${junit.output.dir}"/>
        <junit fork="yes" printsummary="withOutAndErr">
            <formatter type="xml"/>
            <test name="jp.geocities.www.junit.Test" todir="${junit.output.dir}"/>
            <classpath refid="JUnitTest.classpath"/>
        </junit>
    </target>
    <target name="junitreport">
        <junitreport todir="${junit.output.dir}">
            <fileset dir="${junit.output.dir}">
                <include name="TEST-*.xml"/>
            </fileset>
            <report format="frames" todir="${junit.output.dir}"/>
        </junitreport>
    </target>
</project>
■ポイント
・一旦実行した起動構成がプロジェクト内にある場合は<target name="Test">としてbuild.xmlから実行できる形式でエクスポートされます
・antで使用できるXMLタグの詳細はこちらで確認できます
http://www.javadrive.jp/ant/buildxml/index1.html
http://www.ne.jp/asahi/hishidama/home/tech/ant/index.html#h2_Task
0 件のコメント:
コメントを投稿